Hi
I am super excited to show you a new dress! I made McCall's 5094. I have always loved how this pattern looked, but thought it might be really unflattering. Decided to give it a try though after my sister made it, and it looked really cute in person.
So, without further ado, I introduce to you my new dress!
I know a white background, nautical themed summery dress is a little silly to make in the middle of October, but I don't care, I love it. I made it at my sisters house and used some of her leftover fabric. I actually didn't have enough of it, thus the contrast pieces. I love how it turned out though! The ruffle and buttons on the bust were my own creation. I just thought it needed a little something extra.
The pattern was not super difficult to work with, but it was a little more complicated than some. I actually had a ton of fit issues, but I think that's because I have lost weight, and cut out my old size (18). I probably should have gone down to a 16.
All in all, I am quite pleased with my new dress :)
Outfit
Dress ~ Made by me using McCalls 5094
Sweater ~ Thrifted
Shoes ~ Keds
Showing posts with label sewing. Show all posts
Sunday, October 20, 2013
Wednesday, May 29, 2013
A Pretty Party Dress
Yay! My new dress is finished. I was going to wait until I had somewhere fancy to where it, but I just couldn't wait!
I think it turned out really well!
I got a book from the library a few weeks ago called, "The Party Dress Book" by Mary Adams. She is a clothing designer who specializes in dresses. It really inspired me. There happened to be a template pattern in the back already cut out in my size so I went for it.
If you like rigid instruction, you would probably not love it, but if you have general sewing knowledge, or like to do things your own way, then the pattern will probably work for you. The ruffle was added as an after thought because it was way too short for me (I knew it would be though because I was only working with a small amount of fabric; a fitted sheet).
The bodice does not have boning, but I lined the bodice with a light blue fabric. That's why it looks slightly two toned. The skirt is unlined. Thanks to my very adept mother, I have a lapped zipper instead of the intended centered back zipper. And then there are halter straps, and thats it! I personally loved the pattern (minus a few fit issues) because I have always been one to stray from directions. Like, really. In middle school, I tried to improvise while I played the flute. I knew how to read music, I just thought my way sounded better. Little did I know I was playing Jazz Flute a la Ron Burgundy.
Anyway, I am really excited to have a new dress. Sewing is extremely gratifying.
You can't really see the zipper, but my mom did a really great job with it!
Yay for sewing!
Have a great day :)
Outfit
Dress ~ Made by me (using The Party Dress Book)
Keds wedges ~ Kohls a few years ago
Sunday, May 26, 2013
Sneak Peek of My "Party Dress"
Well, it's super late, so I am going to do a super short post. I mentioned last post that I was working on a party dress. I finished it!!!!...okay, well almost finished it. All I need to do is make a small bust adjustment, and sew the straps on.
My kitty Sneezer. She likes to sew too :3
And here is the peek at the dress. I used a vintage 50s/60s fitted sheet that I found at a thrift store.
Cute right?
My kitty Sneezer. She likes to sew too :3
And here is the peek at the dress. I used a vintage 50s/60s fitted sheet that I found at a thrift store.
Cute right?
Monday, January 7, 2013
A New Dress From An Old Sheet
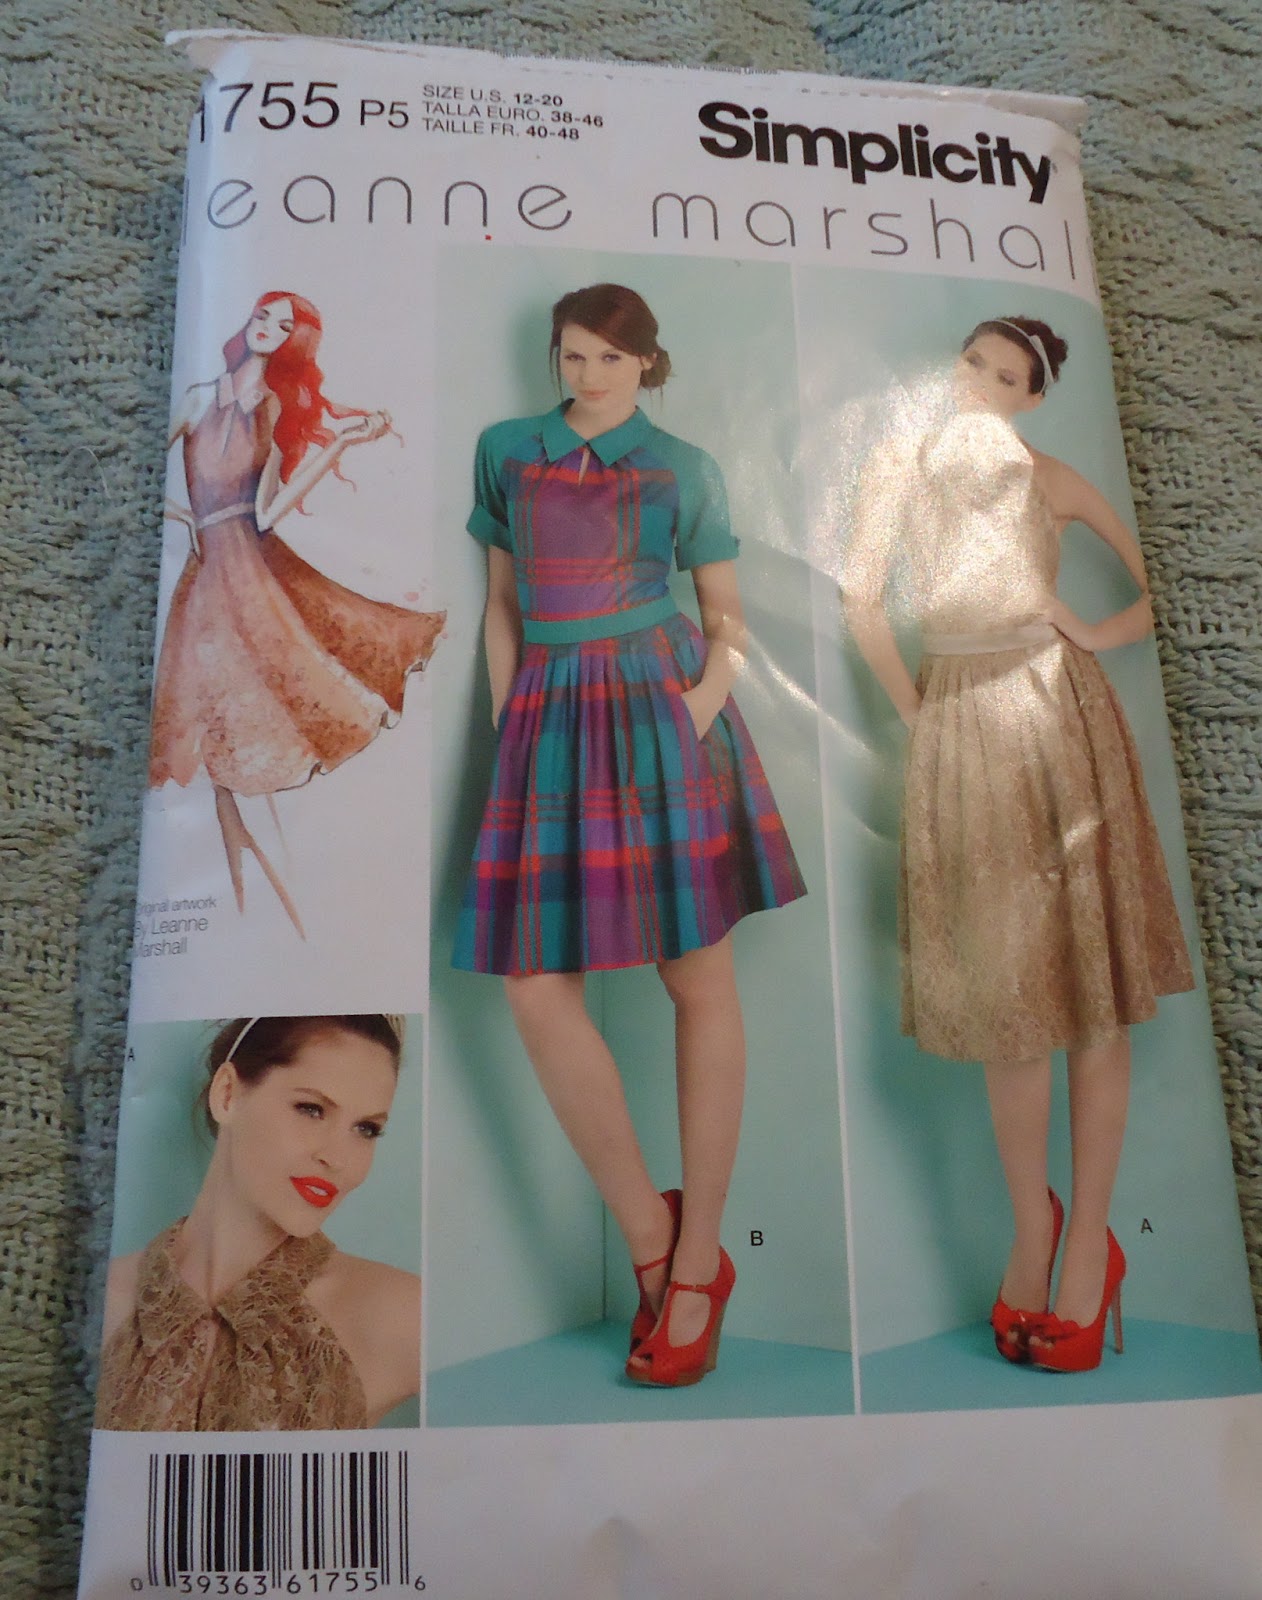
So, in my last post I talked about body shapes and talked about how great sewing was because it really gives you the chance to make something to truly fit and flatter your body. I got to thinking and thought I may as well make a dress to illustrate my point. I always buys a few patterns when they go on sale, so I have quite a few vintage reproductions and retro looking patterns in my possession. I even have a few true vintage patterns, but I am a scaredy cat when it comes to unprinted patterns. I decided to make Simplicity 1755. It's a Leanne Marshall pattern (she was on Project Runway).
I chose to make View B, but I decided to use the skirt from view A because it was longer, and I needed the length on account of being so tall. As you will see in the pictures of my dress, it really looks nothing like the picture. I will start by telling you that it was a muslin. Which, for those of you who don't know, is basically a rough draft of a pattern so you can figure out how to make it fit right. Luckily for me, the bodice fit and the waist hit in the right spot, so I didn't need to make any changes there. In the pattern, it calls for a zipper, but I just added some width to the back and sewed it up to make it slip over my head. It make the waist a little loose, but that's what belts are for :).
You might also notice that the neck line is completely different. That's because I didn't make the collar, and just tacked the edges down to create a somewhat sweetheart neckline.
So anyway, here is the result. I still need to hem it, but it's just for being around the house, so it doesn't need to be perfect. Also, I made it out of an old sheet, so you may notice some parts are more vibrant than others.
I wore a crinoline underneath it to give it a fuller look.
Snow on the ground.
See how on the sides, the print is really faint? That's the middle of the sheet.
Pockets!
So, there you have it. This really didn't take too long. I think it was a total of 3 days, but I didn't work on too long any one day. And this is just a muslin. If I decide to make it in a good fabric (I am still not sure I want too..) it will take me even less time.
Happy Sewing!
I chose to make View B, but I decided to use the skirt from view A because it was longer, and I needed the length on account of being so tall. As you will see in the pictures of my dress, it really looks nothing like the picture. I will start by telling you that it was a muslin. Which, for those of you who don't know, is basically a rough draft of a pattern so you can figure out how to make it fit right. Luckily for me, the bodice fit and the waist hit in the right spot, so I didn't need to make any changes there. In the pattern, it calls for a zipper, but I just added some width to the back and sewed it up to make it slip over my head. It make the waist a little loose, but that's what belts are for :).
You might also notice that the neck line is completely different. That's because I didn't make the collar, and just tacked the edges down to create a somewhat sweetheart neckline.
So anyway, here is the result. I still need to hem it, but it's just for being around the house, so it doesn't need to be perfect. Also, I made it out of an old sheet, so you may notice some parts are more vibrant than others.
I wore a crinoline underneath it to give it a fuller look.
Snow on the ground.
See how on the sides, the print is really faint? That's the middle of the sheet.
Pockets!
So, there you have it. This really didn't take too long. I think it was a total of 3 days, but I didn't work on too long any one day. And this is just a muslin. If I decide to make it in a good fabric (I am still not sure I want too..) it will take me even less time.
Happy Sewing!
Labels:
50's,
crinoline,
housedress,
sewing,
sheet,
simplicity 1755,
upcycle
Wednesday, January 2, 2013
The Plight of the Oddly Shaped
Women are so vastly different. Buying clothing from stores is frustrating sometimes because it is hard to come up with shapes and styles to fit every body. Even with specialized sections like petites and talls it's still hard.
Anyway, hope I have given you something to think about. I am not advertising for her or anything, I just really like her stuff :).
Fit issues, for me, have been a problem my whole life. When I was a young child (from about 3-9) I was extremely thin and a little on the tall side. My mom had to buy pants from the "slim" section, and even those would fall off. It seemed I was destined to be naturally willowy. But that all changed in 5th grade. I hit puberty early, and fast. I was the only 5th grader in my entire school who had boobs. I wore a 34 B when I was ten and eleven. Not only did that happen, but I gained quite a bit of weight in my face and tummy as well. And along with puberty came a huge growth spurt and I was towering above all the girls and boys. Good thing for me I was never the type prone to low self esteem or depression because I was quite an odd looking duck. In 5th grade I also experienced one of the worst things ever...I had to start shopping in the women's section. I was in denial at first, but I finally gave in when my pretty shirts from Limited Too started to look more like sausage casings and less like pretty shirts.
All through middle school not much changed. I was chubby and very tall. Around freshman year of high school my weight re-positioned into more of an hourglass shape than an apple, and I had finally stopped growing at 6'1". I never really regained my thinness, I am a definite full hourglass, even though my wrists and ankles are very thin.
A lot of people say that hourglasses look good in almost everything. Well that isn't true at all. If you aren't wearing something that accentuates your waist, you can very well appear larger than you actually are. For me, not only am I an hourglass, but I am also tall. Not just tall, but unusually tall. Most girls over 5'8" consider themselves tall, and maybe they are, but that just make me extra tall. Most tall items that stores carry are still a little on the short side for me. And a lot of the styles I like (vintage/vintage reproduction) don't even have tall sizes available. *sigh*
So what's a tall, hourglass shape like me to do? Or any other non cookie-cutter size for that matter. I would say the est thing would e to make your own clothes. Now I know a lot of women don't really know how to sew, let alone own a sewing machine. But it is really not all that difficult. If you want to learn how I suggest taking a few classes at Jo-Ann's or finding someone in your area who knows how to sew and ask them to give you a few lessons. Personally, I am kind of self-taught, but having a mother and older sister who sew has helped quite a bit. And if it's an expensive sewing machine stopping you, don't let it. If you want to make a good investment a quality machine is great. But you can find great machines at thrift stores, garage sales, or estate sales. I have 2 machines. One was given to me by mother, a 60's or 70's Singer model. And my other machine is another Singer from the 50's with it's own desk. It also came with all the original attachments and accoutrements. It was $75 at a church garage sale, but since I was volunteering at the sale, they gave it to me for $10, which was so very sweet.
Or maybe you simply won't be swayed, There are plenty of seamstresses out there! Find one to make a garment for you. Some people balk at the prices, but the quality is going to be much better, last longer, and fit better than anything else you own. Definitely worth it. And really the price isn't too bad.
If it's vintage clothing you are longing for and can never find anything to fit,I highly recommend the seller on Etsy, TimeMachineVintage. I have been ogling her stuff for months! I don't have the money right now, but eventually I would like to order something from her. Her work is amazing! She can take any vintage pattern and make it to fit you to a T.
Or maybe you simply won't be swayed, There are plenty of seamstresses out there! Find one to make a garment for you. Some people balk at the prices, but the quality is going to be much better, last longer, and fit better than anything else you own. Definitely worth it. And really the price isn't too bad.
If it's vintage clothing you are longing for and can never find anything to fit,I highly recommend the seller on Etsy, TimeMachineVintage. I have been ogling her stuff for months! I don't have the money right now, but eventually I would like to order something from her. Her work is amazing! She can take any vintage pattern and make it to fit you to a T.
All images from TimeMachineVintage on Etsy.
Anyway, hope I have given you something to think about. I am not advertising for her or anything, I just really like her stuff :).
Sunday, December 16, 2012
The Making of A Corset
So, I have been wanting to do a sewing post lately, but unfortunately I do not have anywhere to sew because one of my brothers decided he wanted to use the desk I was using and put it in his room. So my projects and patterns are scattered around in baskets. However, awhile back (I think it was in October of 2011) I took pictures along the way of my adventures in corset making. So I will relive it. Excuse the grainy pictures, this was before I had a digital camera, so they were all taken with my iPod touch.
This was actually my second "muslin" for the corset. The first one I made up was terrible it was too big and much too short. So for this one, I had to add 3 inches to each of the bodice panels. I was kind of sad that I didn't line this one, because it turned out really well. I used a Simplicity pattern, 5006. Which has a corset, and a few different petticoats. Most of the process photos of the light blue corset muslin, were from my first rough draft (I used a dark blue contrasting thread).
Because boning is so expensive, I decided to only buy some boning, and then cut up this old shape-wear corset I had had for a very long time. I got it secondhand and never wore it because it was too small.
Yes, my pincushion is an old teddy bear. It looks a little gruesome, but it's how I justify keeping her. I have had this teddy bear since I was 2 or 3. My mom bought it at a sale at an old folks home. Some lady made it by hand using upholstery fabric and thick red thread.
Pinning away (which is much better than pining, let me tell you).
This is the extra boning I used for the rest of the corset. The shapewear I cut up had steel coil boning, which I vastly prefer, but I could not find steel boning at the fabric stores, and did not want to order it online.
In the spirit of recycling, for the muslin version of the corset, I re-used the boning channels.
Putting the steel boning in, to see if it would fit.
This was the last panel, where the grommets were going to go.
Rough draft grommets.
All the lovely seams! I didn't add boning channels, or boning to most of my rough draft, I only did it enough to feel comfortable when I made my final draft.
Okay, so now some process photos with my brocade. I was disappointed by the selection, but this blue with a feathery, silvery design was really pretty, so I went for it. You can see in this picture, where I cut the pattern to add length. I supplemented with brown paper from grocery bags.
For my finished garment, I used unbleached cotton muslin fabric as a lining.
I thought this was funny, my machine sewed all the way through my plastic pin! I had to cut it out, because it was literally stitched down. :)
You can buy boning channels, and sometimes channel fabric comes with the boning, but for the boning channels on the brocade, I wanted something a little sturdier. So I decided to make my own using the brocade. I cut strips of brocade, and then lined those with cotton for extra durability. So it goes brocade, cotton, space for boning, cotton, brocade. Then I sewed them down on the seams like regulars channels!
And the final product!
This picture was not the greatest, but you get the idea.
A better picture. This was the night I wore it out. I wore it to a friends New Years Eve party. I thought the silvery on the blue was festive, and paired it with jeans and a cardigan.
Of course it wasn't perfect. I don't have a serger, and brocade is so prone to fraying. And I never put trim on it. The size was good around the waist and hips, but I took it in a touch too much, so the bust is snug.
But other than that, I was pretty proud of myself.
This was actually my second "muslin" for the corset. The first one I made up was terrible it was too big and much too short. So for this one, I had to add 3 inches to each of the bodice panels. I was kind of sad that I didn't line this one, because it turned out really well. I used a Simplicity pattern, 5006. Which has a corset, and a few different petticoats. Most of the process photos of the light blue corset muslin, were from my first rough draft (I used a dark blue contrasting thread).
Because boning is so expensive, I decided to only buy some boning, and then cut up this old shape-wear corset I had had for a very long time. I got it secondhand and never wore it because it was too small.
Yes, my pincushion is an old teddy bear. It looks a little gruesome, but it's how I justify keeping her. I have had this teddy bear since I was 2 or 3. My mom bought it at a sale at an old folks home. Some lady made it by hand using upholstery fabric and thick red thread.
Pinning away (which is much better than pining, let me tell you).
This is the extra boning I used for the rest of the corset. The shapewear I cut up had steel coil boning, which I vastly prefer, but I could not find steel boning at the fabric stores, and did not want to order it online.
In the spirit of recycling, for the muslin version of the corset, I re-used the boning channels.
Putting the steel boning in, to see if it would fit.
This was the last panel, where the grommets were going to go.
Rough draft grommets.
All the lovely seams! I didn't add boning channels, or boning to most of my rough draft, I only did it enough to feel comfortable when I made my final draft.
Okay, so now some process photos with my brocade. I was disappointed by the selection, but this blue with a feathery, silvery design was really pretty, so I went for it. You can see in this picture, where I cut the pattern to add length. I supplemented with brown paper from grocery bags.
For my finished garment, I used unbleached cotton muslin fabric as a lining.
I thought this was funny, my machine sewed all the way through my plastic pin! I had to cut it out, because it was literally stitched down. :)
You can buy boning channels, and sometimes channel fabric comes with the boning, but for the boning channels on the brocade, I wanted something a little sturdier. So I decided to make my own using the brocade. I cut strips of brocade, and then lined those with cotton for extra durability. So it goes brocade, cotton, space for boning, cotton, brocade. Then I sewed them down on the seams like regulars channels!
And the final product!
This picture was not the greatest, but you get the idea.
A better picture. This was the night I wore it out. I wore it to a friends New Years Eve party. I thought the silvery on the blue was festive, and paired it with jeans and a cardigan.
But other than that, I was pretty proud of myself.
Subscribe to:
Posts (Atom)